This is the new 5-inch racing drone I have built to replace the Moskito 70 that I was refunded recently. This one will be a good quality racing style drone that should be plenty durable for my learning to race! 🙂
Here is the list of parts. The Top links are Amazon links the link below are Banggood links (China’s version Amazon) Most of the time you can find the same or similar items on Banggood cheaper. The only drawback is the amount of time it takes for shipping. It seems to be taking me about 20 days to get things from Banggood. If you are willing to pay a bit more Amazon has most things via Prime so 2 days is realistic.
I will describe why I picked the items below and share the link to purchase the exact item from Amazon. The banggood link could be the exact item or a similar item.
Frame:
Amazon: OWL RC – DSX-5 Frame
Banggood: OWL RC – DSX-5 Frame
The Frame is the Owl RC DSX 5 Frame. I picked this one because of the 5mm arms. A friend that I fly with Pat has this exact frame he used in an X1 swap and is loving it so I decided I would use the same frame. It is a very solid frame because of the 5mm arms and I think the tightness of the way the stack mounts. It feels like a rather strong frame to take the beating of my crashes! I wanted something that I could keep learning to fly with and not have to worry too much about crashing and breaking the frame or top plate. The only complaint I have is the amount of camera that sticks out past the frame. I am sure if I break anything it will be a camera or lens! I think Pat has 3-d printed a bracket to protect the camera so I hope I can get one of those to protect mine. After building this frame I think it will hold up great!
ESC’s:
Amazon: Spedix GS30 30A 2-4s BLHeli_32 Dshot ESC
Banggood: Spedix GS30 30A 2-4s BLHeli_32 Dshot ESC
I chose these Electronic Speed Controllers because of the reviews I have seen on the web. These are 30 Amp continuous ESCs with 40Amp bursts for < 10 seconds. They are the Bheli_32 with DShot 1200 which is the latest protocol. They do not have LEDs or Telemetry like most of the ESCs in this class. I am not worried about not having the LED’s since I heat shrink and Electrical tape my ESC’s to the arms of the frame. I am also not so worried about telemetry since Betaflight will only show the temperature of the hottest ESC and average RPM of all the motors. I mainly wanted something that was going to be reliable and able to handle these new really fast TMotor F40 PRO II – 2600KV . These are the newest version of their motor and it is lighter and produces about 20% more power than the previous version! I wanted to make certain the ESC could handle this AMP draw without burning up. It appears they are a good ESC based on some reviews and the noise tests that Drone Mesh did to this ESC. The video is linked below.
Flight Controller:
Amazon: Holybro Kakute F4 AIO V2
Banggood: Holybro Kakute F4 AIO V2
This was another recommendation from Pat. I also read the reviews and Joshua Bardwell helped design the flight controller. He also wrote the manual so I knew that I could follow his pinout and should be able to solder up all the connections without issues! This flight controller has the Gyro mounted on a piece of foam so you do not need to use the anti-vibration standoffs. That to me presented another type of problem of being certain not to run any of the wires close enough to it to cause issues. I got the V2 of this board which moved a few of the pins around which I thought were in great positions. This looks like a well thought out FC that supports 5 hardware UART so you have plenty. It has the 128 MB Dataflash chip for Blackbox logging so no need to worry about the sd cards flying out during a crash! Below is a video where JB talks about the V1 of this flight controller.
Battery Pigtail:
Amazon: xt60 lipo pigtail 12 AWG
Banggood: xt60 lipo pigtail 12 AWG
This is what provides the power from the battery to the Flight Controller. You need to make certain that the AWG of the wire is enough to provide the power needed for the motors under load. I went with the 12 AWG just for a little overkill. Joshua Bardwell has a video of testing this theory his testing says that the difference between 12 AWG and 14 AWG for our applications is so small that it does not really matter. I agree that his math looks correct but for the Pigtail to the FC, I went with 12 AWG just for the overkill. 🙂
Standoff:
Amazon: Anti-Vibration Flight Controller Standoff
Banggood: Anti-Vibration Flight Controller Standoff
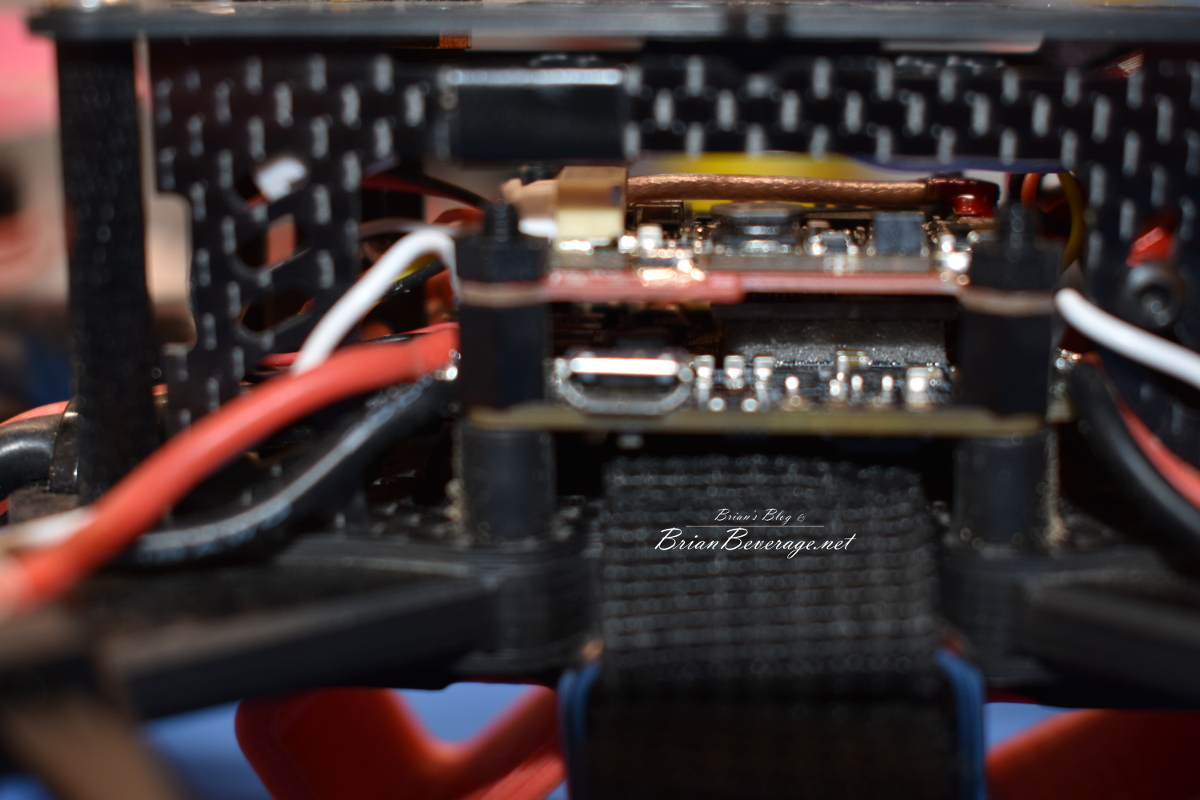
I did not have to use these based on using the Holybro Kakute F4 AIO V2 it has the gyro sitting up on foam. I used them because I needed to get the stack to a precise height so that the VTX could fit in the stack and the carbon fiber sides still fit down in the slots. It took several tries and a couple different lengths of standoff and screws to get to the proper height. I ended up using a 12mm screw and no nut just straight into the Anti-Vibration Flight Controller Standoff.This created enough room below the FC and above that, I could mount the WhiteNoise FPV TBS Unify Pro Mounting Board with the TBS Unify Pro 5G8 HV (SMA) but not the receiver on the bottom like Joshua Bardwell does it. I mounted the receiver in the back between the bottom frame sections. These are some nice standoffs for reducing vibration.
VTX:
Amazon: TBS Unify Pro 5G8 HV (SMA)
Banggood: Not Available
This is the best rated VTX that I have found. It allows you to change channels and setting using the smart audio port on the FC. This allows quick channel and power changed right through the goggles using the controller! I used this VTX in the LabBuild after breaking the original VTX in a crash.
VTX Mounting Board:
Amazon: WhiteNoise FPV TBS Unify Pro Mounting Board
Banggood: Not Available
I happened across this while watching something on Joshua Barwell’s youtube channel. On the lab210 build, we used a more inexpensive VTX which worked but did not have the features or the ability to easily change a channel. It was also mounted on the top plate via a zip-tie. I wanted to get the VTX into the stack so that the build was cleaner and the VTX was protected. That is where the WhiteNoise FPV TBS Unify Pro Mounting Board comes in it allows you to solder the TBS Unify Pro 5G8 HV (SMA) to the board and mount the entire thing in the stack! That makes the build a lot cleaner and protects the electronics much better in the event of a crash.
VTX Antenna:
Amazon: Lumenier AXII Stubby 5.8GHz Antenna (LHCP)
Banggood: Realacc Stubby 5.8GHz Antenna (LHCP)
I really wanted to try a Stubby antenna just to make it a lot less likely to break in a crash. This frame has the Antenna mounted to the rear of the top plate. With a normal length antenna, I could see that being a point of breakage! 🙂 My thinking was lowering the angle that a crash would be pushing on the antenna might stop it from having the force to break the antenna at the mounting point. We will see if that theory holds. Below is a photo of what the antenna looks like mounted on the frame.
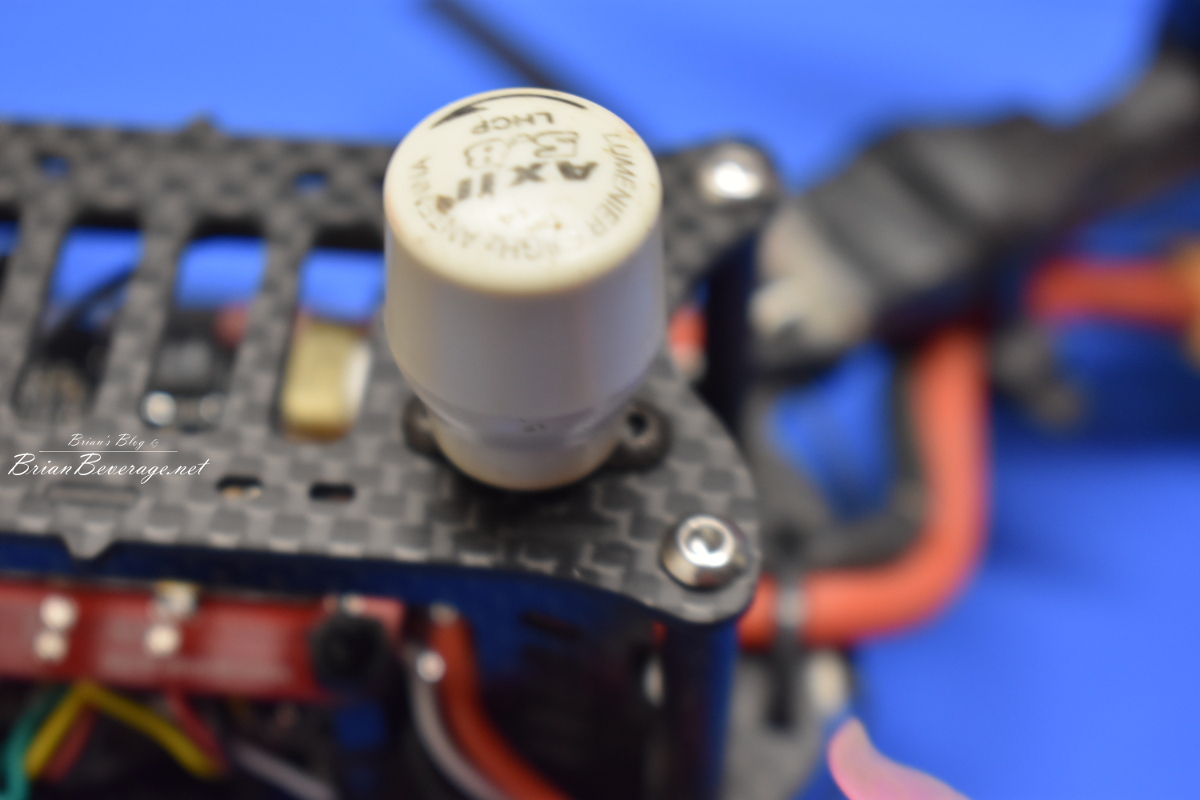
You will notice from the picture above that this stack does not have a lot of extra room with the VTX mounted on the top. it makes for a nice clean build and wiring in my opinion. It also keeps the VTX in a spot that should not get damaged in a crash.
Motors:
Amazon: TMotor F40 PRO II – 2600KV
Banggood: TMotor F40 PRO II – 2600KV
These are the latest and greatest motors from TMotor. They are the HIGH RPM 2600 version. I got these trying to build a fast drone and was not worried about efficiency. When it comes time to race I might swap these out for the 2400 version to get a bit better runtime. Then I will put the 2600’s on a freestyle drone where you need to power to pull off certain tricks. These are some great motors they are about a 20% increase over the previous version and are a bit lighter. I really was going for a red theme but since grey was the only color in stock that is what I got…. They seem like a great motor and reading the reviews should produce lots of power! Below is a video Joshua Bardwell made about these motors:
Motor Mounts:
Amazon: Motor Soft Mount Silicone Pad
Banggood: Motor Soft Mount Silicone Pad
I really did not need to use these but since I really wanted to do a nice build and have something that will last under the abuse of hard flying I added these just for some extra vibration dampening.
Motor Screws:
Amazon: iExcell M3 x 6mm/8mm/10mm/12mm/16mm
Banggood: Suleve™ M3SS1 M3 Stainless Hex
I bought an assorted box of screws knowing that I would need to have multiple lengths on hand. I used the 8mm from this set to mount the motors with the silicon pads. Adding a little Loctite to make certain everything stays tight.
Camera:
Amazon: RunCam Eagle 2 FPV Camera – 4:3
Banggood: RunCam Eagle 2 FPV Camera – 4:3
Receiver:
Amazon: FrSky R-XSR Ultra Mini Redundancy Full Telemetry Receiver
Banggood: FrSky R-XSR Ultra Mini Redundancy Full Telemetry Receiver
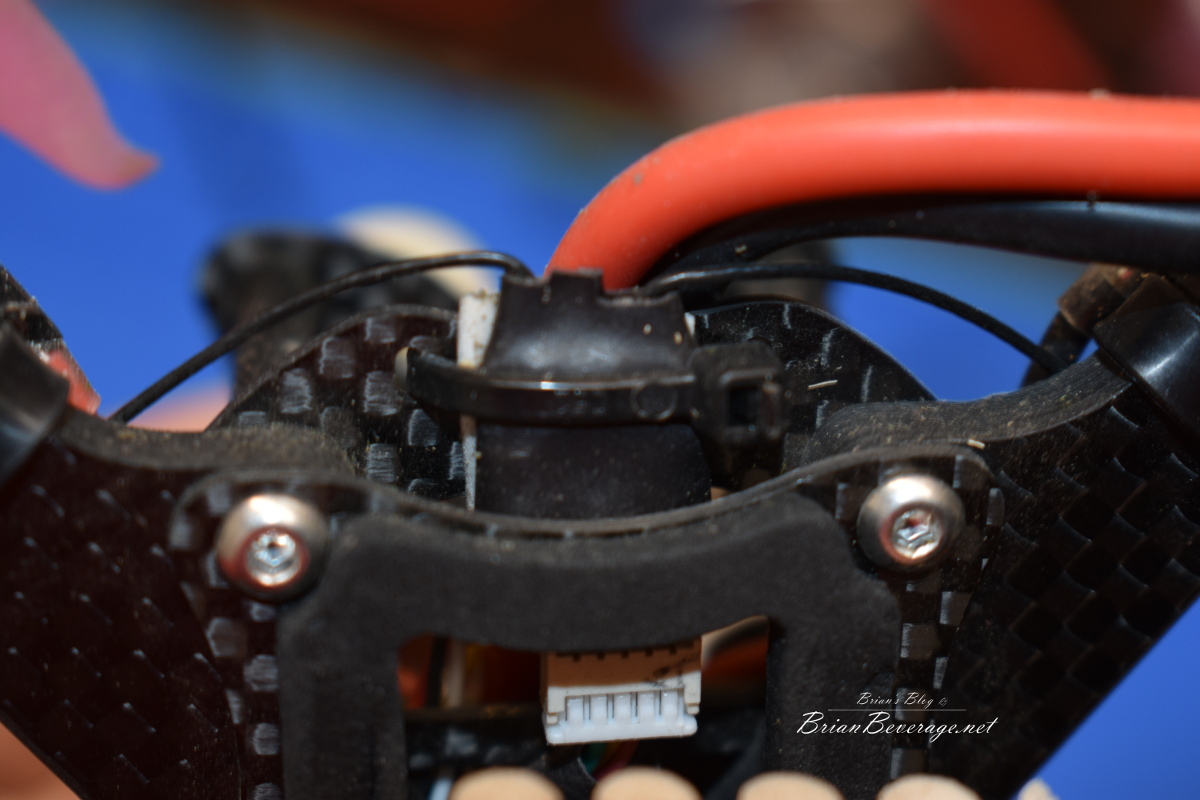
This is a nice receiver with removable antenna and has telemetry so it can return sensor information back to the controller. This is useful for setting alarms and whatnot on the FrSky Taranis X9D. I got this all soldered in and mounted in a safe place between the lower plates. Below is the picture of where I mounted it on my build.
Props:
Amazon: RaceKraft 5046 Tri-Blade
Banggood: Not Available
Amazon: DAL 5×4.5 – 3 Blade
Banggood: DAL 5×4.5 – 3 Blade
I went with 2 styles of props to try one more aggressive than the other to see how the 2 compared. I will have to do a blog post on how the drone flies and what kind of difference the props make. You can see from the pictures below how different the props are shaped. Pat was telling me he really likes the RaceKraft 5046 Tri-Blade props they feel like they produce a lot of torque. The drone feels like it can change directions really quickly with those props. He also says they are really durable so that’s a very big plus! I cannot wait to give them a go.
I thought I would try the DAL 5×4.5 – 3 Blade props just because they are a little less aggressive and Joshua Bardwell recommended them on his blog.I figured I would give them a try and compare them with the RaceKraft 5046 Tri-Blade
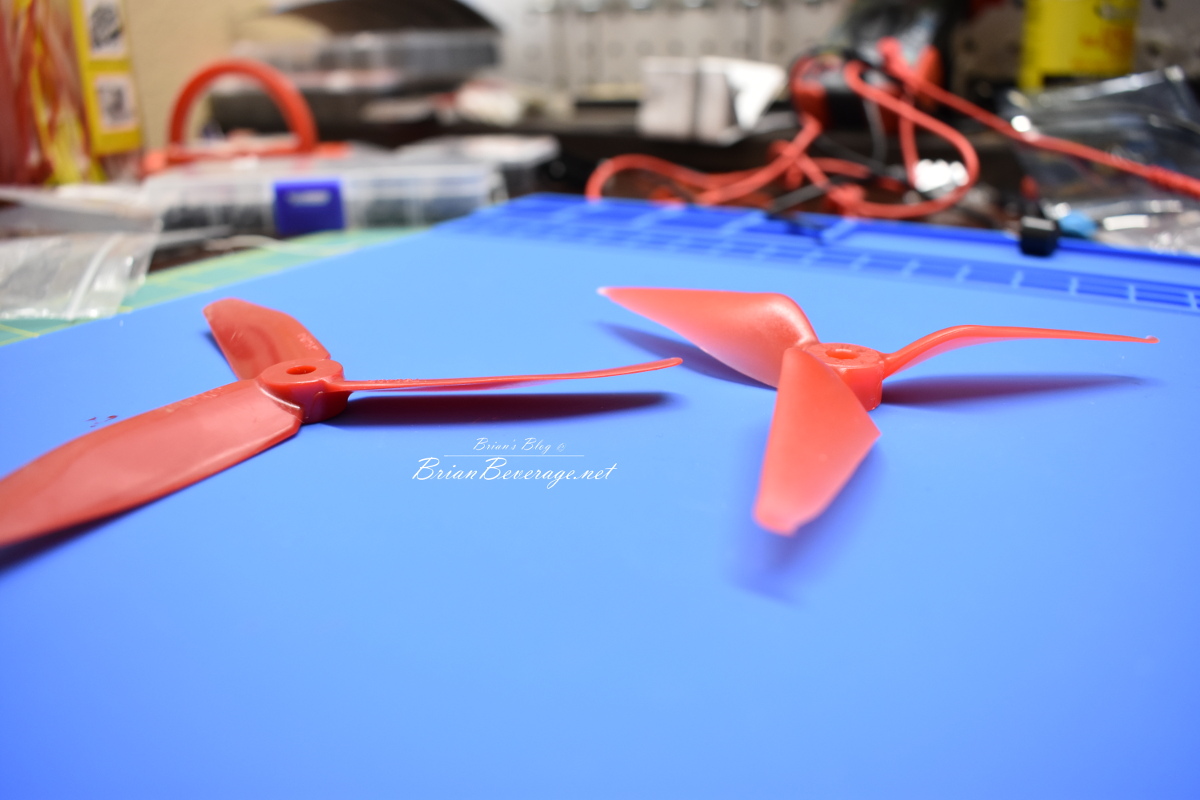
as you can see from the above picture the RaceKraft 5046 Tri-Blade prop has a more substantially more pitch.
In conclusion, I am hoping to build a very fast yet durable quadcopter that I can race once my ability has risen to that level. I am wanting something that will hold together while I learn to fly through gates and around obstacles while having some great features and a clean build. I think this build will achieve those goals and have a great flying drone with lots of power to be competitive once I am confident enough in my abilities to fly on a track. I have some of the footage of what I have built so far and will try and get that edited and add it to a blog post.